
ASSIGNMENT
For this assignment, the focus was to explore at least 1 natural dye or bacterial dye & 1 crafted or grown material, by mixing, matching, changing amounts or patterns and compare the results. Part fo the assignment consisted in ordering, displaying, mapping / comparing and crediting, for the process and the results:
- Ordering – organised material is knowledge. Name your materials, classify them by typology.
- Displaying – display them in a way that makes sense. Badly displayed materials, loose all their beauty.
- Mapping is essential for comparing results. Change small elements in a recipe and compare the results.
- Credit your recipes and changes
INSPIRATION
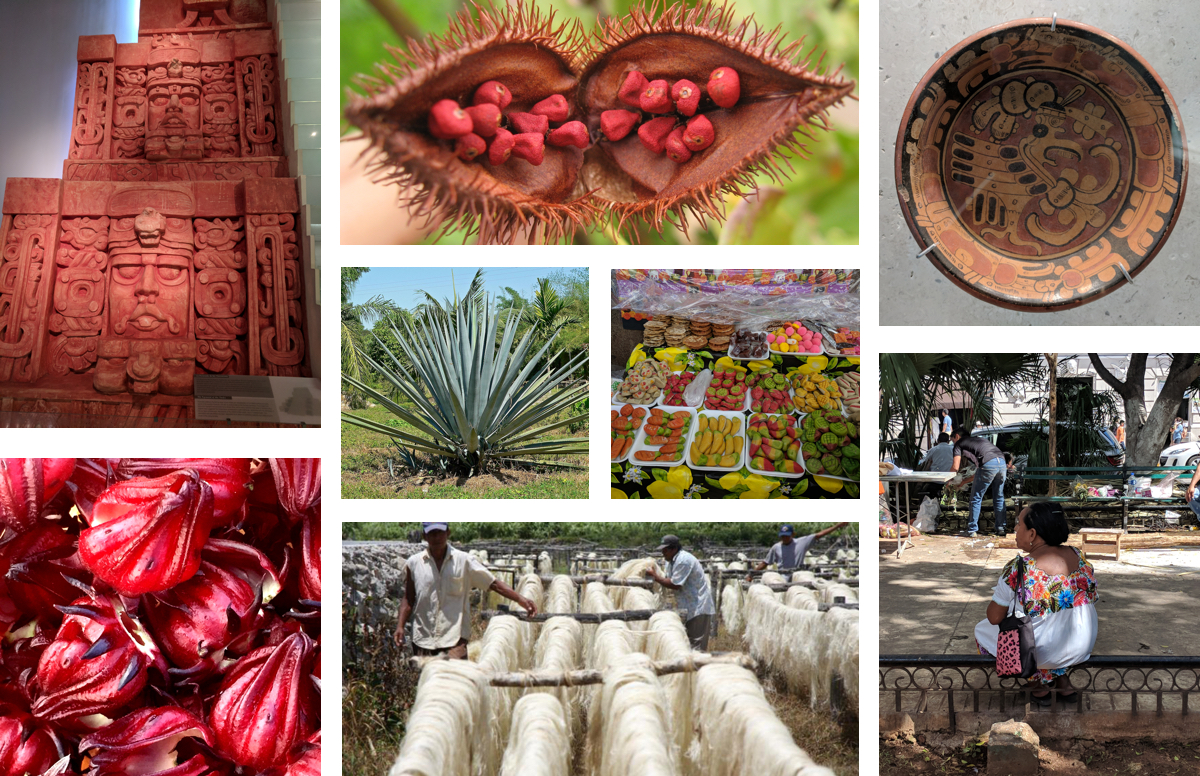
For this assignment, I was inspired by the Yucatecan colors and great variety of plants. Ideally I wanted to recreate some of the warmth and vibrancy of the mayan art, as well as use locally cultivated 0 Km products, in order to foster a sustainable and locally relevant dyeing practice. Famously Mexican are the Flor de Jamaica (Hybiscus) as well the Achiote (Anatto) seed. Typically Yucatecan is the Chaya leaf and many other products that I wish to try another time.
OBJECTIVES & PLAN
The objective is to explore 4-5 different bio dyes and 2 bio materials. The process will be as follows:
- Create a bio plastic (already made in Week 2) and fix the issues I had with it
- Make Kombucha with and without tea and see the difference
- Create bio dyes and try them on linen, jute and bio plastic
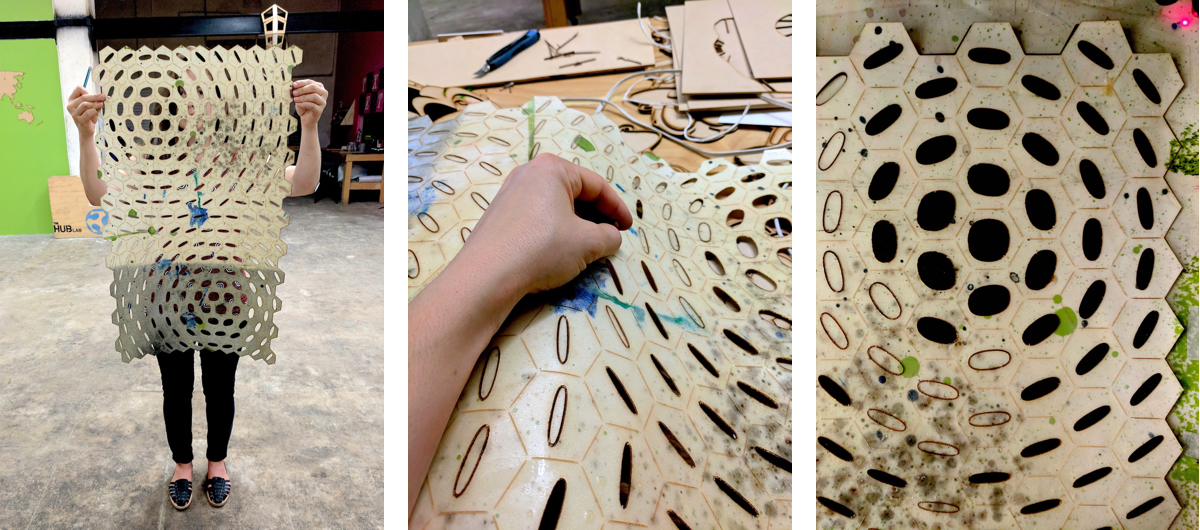
bio plastic + paper composite
During Week 2, we experimented with bioplastics in order to create the skin of the mannequin.
You can check here to refer to the first iteration of this process and grab the recipe.
I will add that an interesting and unexpected result in the creation of bio plastic was the creation of a composite material composed by bioplastic + paper: because we used foam board as the base to cure the bioplastic, the upper paper layer of the foam board became part of the bioplastic, together with the designs it had. The result was very interesting
LESSONS LEARNED
- If you want to add an illustration or decorated pattern to your bioplastic, laying it on top of a paper sheet and letting it cure will do the trick 😁
- If your bio plastic is exposed to a warm humid environment while curing, it will most likely develop MOLD. Also, do NOT cover it while it's curing, as it creates food for mold
- To prevent mold from invading, add some vinegar to the mix. It's not a guarantee of success, but it can help.
FIXING BROKEN BIOPLASTIC
When laser cutting the second sheet of the bioplastic+paper composite, a mistake in the power settings of the laser cutter for the engraving of the hexagons caused them to be cut instead of engraved. This phenomenon hindered the integrity of the sheet, as most of the cuts went through.
ITERATION 1
Instead of trashing the material and starting over, I decided to try and fix it, by applying a variety of methods:
- Vynil glue
- Resistol
- Super glue (Kola Loka in Mexico)
- Recycled bioplastic
I applied the different types of adhesives on selected areas of the broken bioplastic sheet, labeled them and waited 24 hours to see the results.
*The recycled bioplastic came from reheating the scraps of the bioplastic+paper sheets with a bit of additional water, and applying the paste inside the cuts. The process was quite laborious and would have been quicker by using a brush rather than a stick.
After 24 hours, it was clear that the method that had worked was the recycled bioplastic. All the other glues failed at binding with the material.

On the left you can see the bioplastic engrave lines went too deep, cutting the material all the way through. On the right all the different types of glues I used to try and repair it.
ITERATION 2
After evaluating that the recycled bioplastic worked well when reheated and applied, I decided to do an extreme zero-waste intervention by only using the bioplastic recycled from the sheets, and see if it worked.
The result, after 72 hours curing, was that the bioplastic was fixed in some parts, but in others it needed more material to close more completely.

ITERATION 3
Together with Melina, who was doing her own sheet of bioplastic, I made some more bioplastic, this time adding red coloring to it, and then spread it more abundantly with a brush on the whole sheet.
After 4 days curing, I removed the sheet from the acrylic support and add a result, 85% of the sheet was fixed.
The remaining was weaker and probe to break if force was applied to it. The cool effect was the addition of the red blotches, giving it a bit of a creepy bloodlike look.

I then used a hot gun to shape the bioplastic skin on the mannequin, and realized that the hexagons could break up again with heat, but also re-glue themselves up. Overall, the bioplastic can mold after curing, but not to the fullest extent.
CONCLUSIONS
- Next time I'll be more careful with my engraving settings 😅
- When fixing a bioplastic, more bioplastic is better than less plus it's time consuming with worse material performance, so better to assess if it's best to proceed or to just make a new sheet altogether

KOMBUCHA WITH AND WITHOUT TEA
At Fablab Yucatán we have an expert on kombucha, so we thought it would be interesting to experiment with the kombucha leather.
Since the process to make kombucha leather takes a bit more than one week, this is a work in progress.
WHY WITH & WITHOUT TEA?
Together with our kombucha expert, we want to test a question regarding the bed for tea to actually make kombucha.
We already had a SCOBY provided by a friend, so we created two recipes, one adding black tea to the mix and one just adding the sugar.
*The SCOBY utilized was quite mature, and a bit dry.
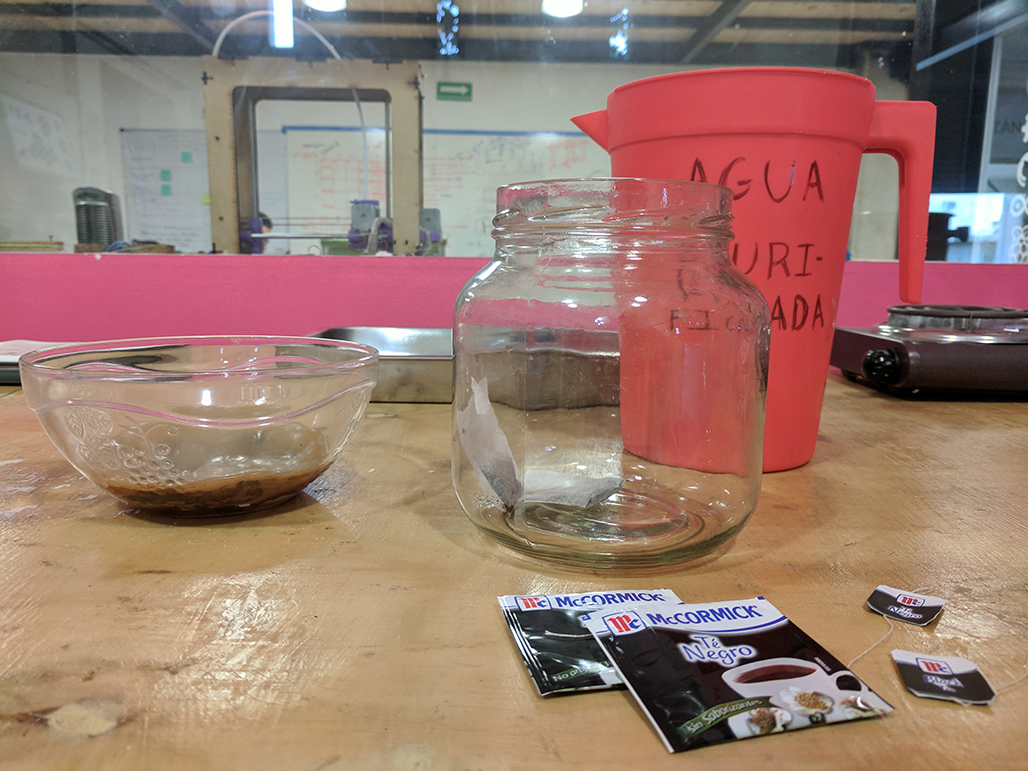
RECIPE(S)
The recipe was provided by Fablab Yucatán internal documentation created by Manolo, the kombucha expert. The variation on theme included adding black tea instead of chamomile
- 3 liters of water
- 2 bags of black tea (or not)
- 1 cup of sugar
- 1 scoop of SKOBY ( Acronym for Symbiotic Culture Of Bacteria and Yeast), also called Mother

RESULT
In terms of the differences between the Kombucha with Black Tea and the one with no Tea, the growth of the Mother was high in both. After a week there wasn't a lot of visible difference in the growth, while after 3-4 weeks the Kombucha had grown a lot. trial and after 2 months it REALLY GREW.
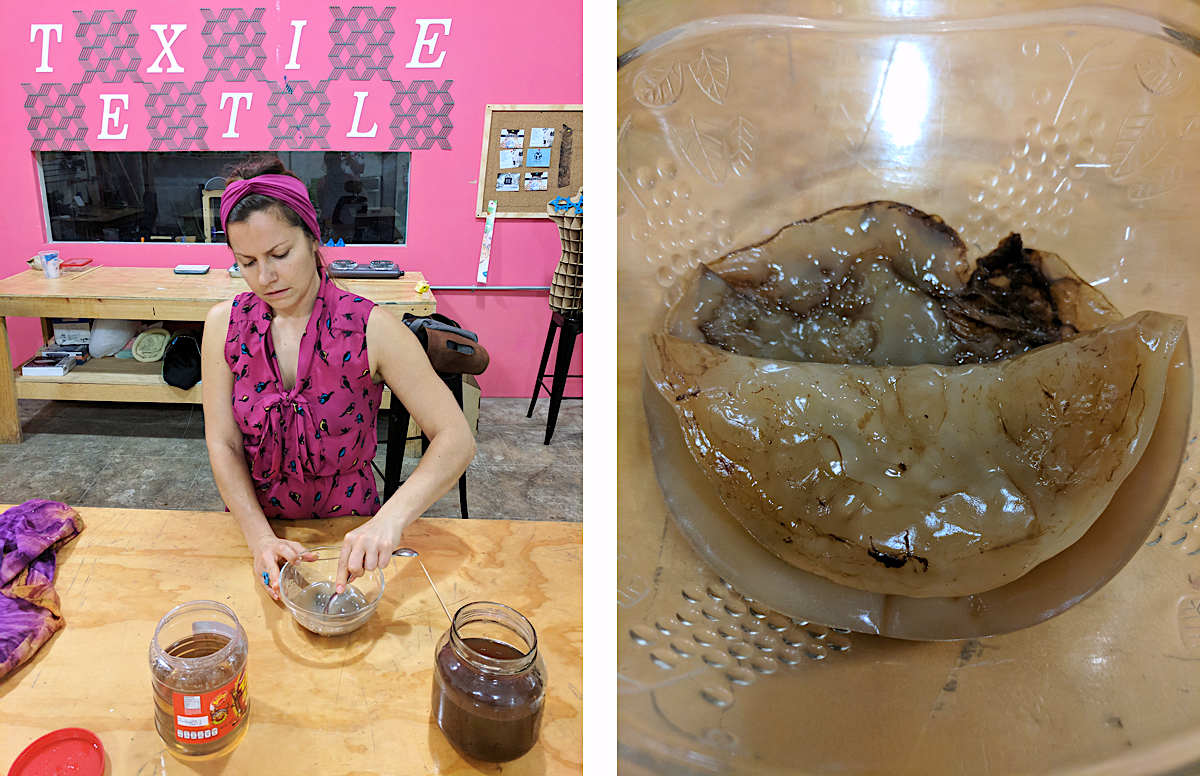
MAKING THE KOMBUCHA LEATHER
After about 1.5 months from the making of the Kombucha, we decided to make Kombucha leather with the Black Tea one. Here below is a visual tutorial explaining how we made it and what our result was. Overall it took us 4 weeks from making the Kombucha to obtaining the final Kombucha leather.
NOTE! The Kombucha became quite brittle, almost like rice paper. I recommend you try and achieve a thicker layer and make sure to put coconut oil on it to keep it soft.

STEP 1. Remove the Mother from the Kombucha

STEP 2. Place Mother in a jar to reuse

STEP 3. Remove gently Kombucha from the water

STEP 4. Place Kombucha on desired surface to dry

STEP 5. Let the Kombuchadry on the surface, for 3-6 days.

STEP 6. When it's cured, put coconut oil on it to keep it flexible.
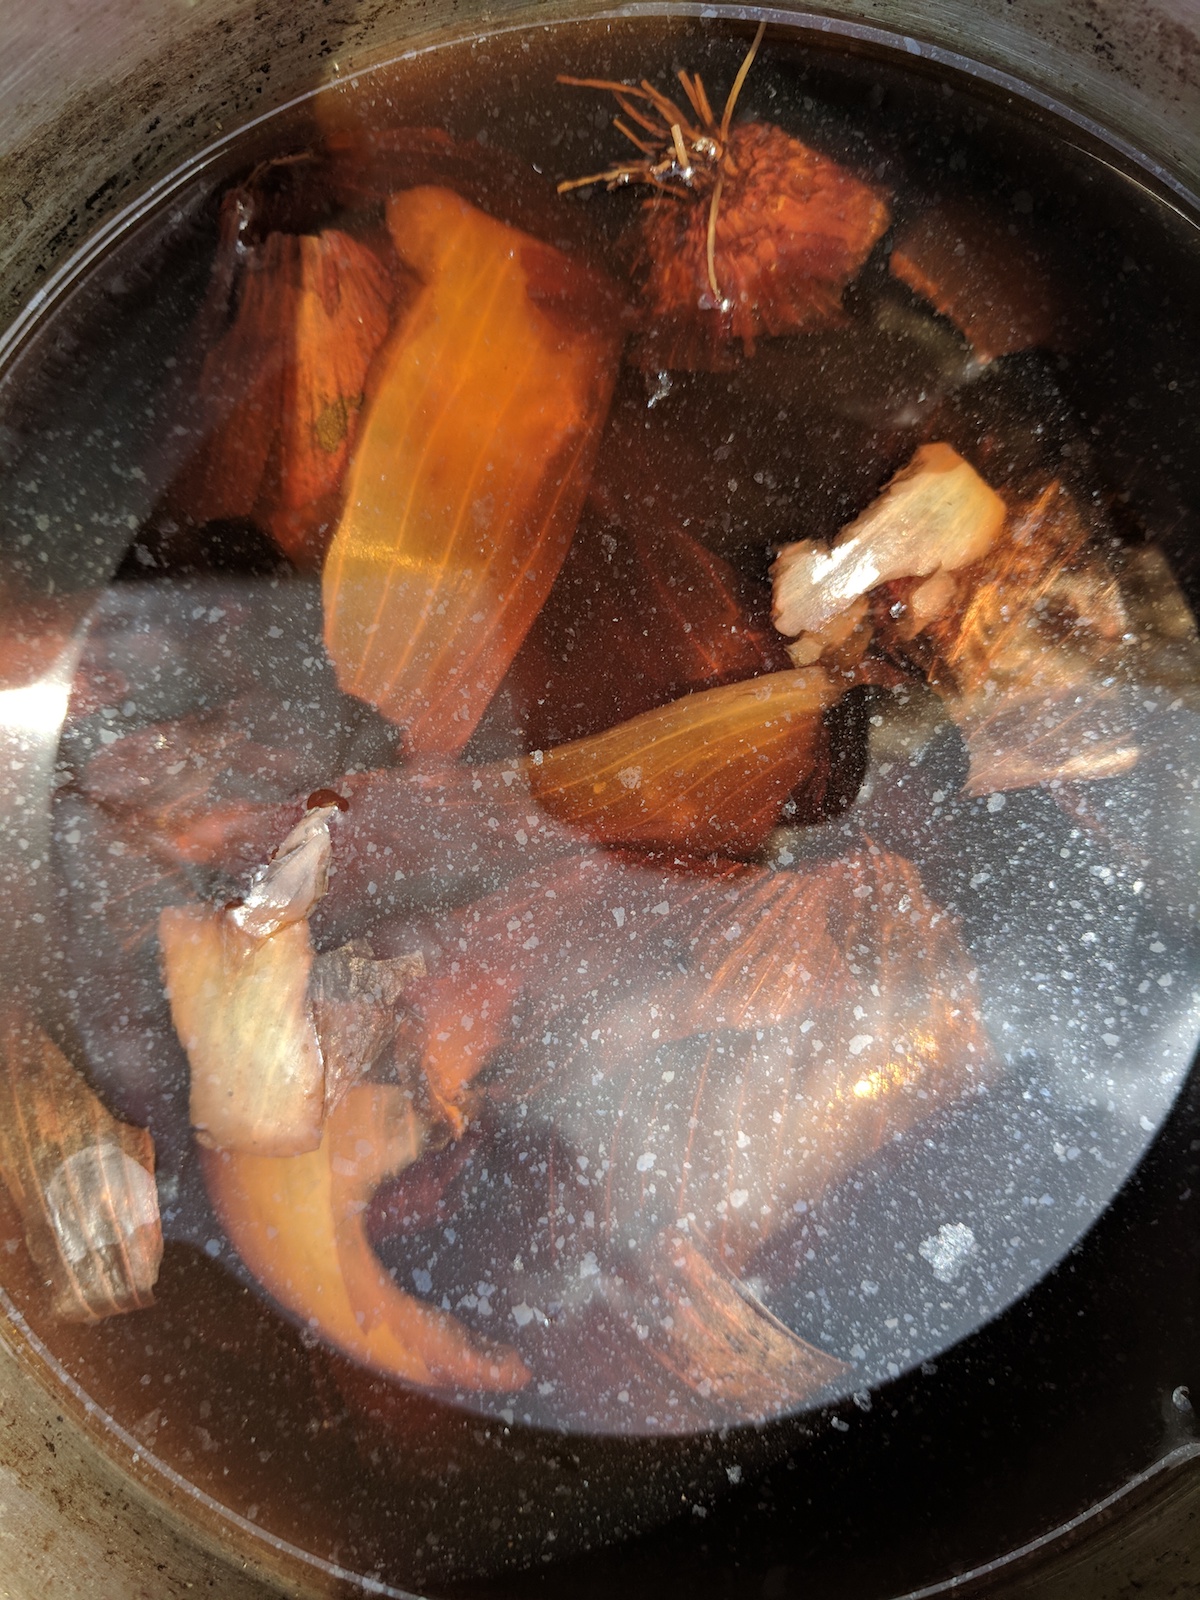
SOURCING BIO DYE
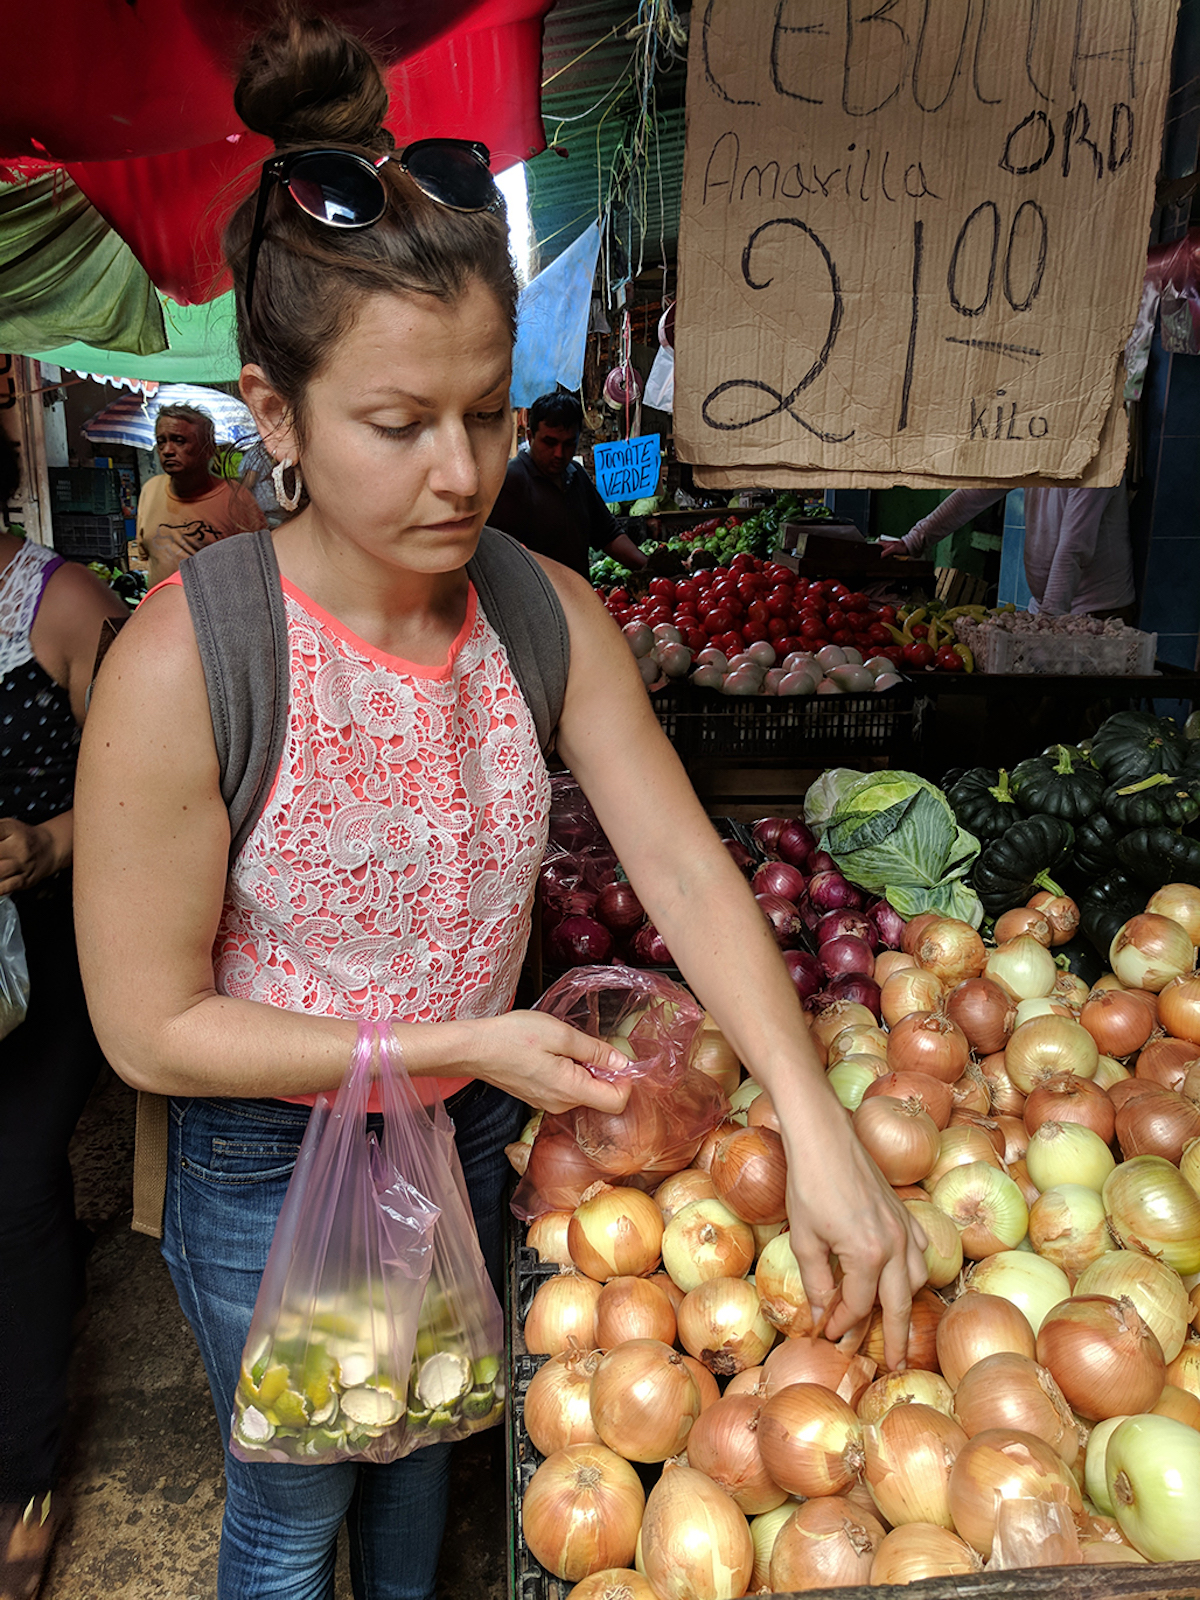
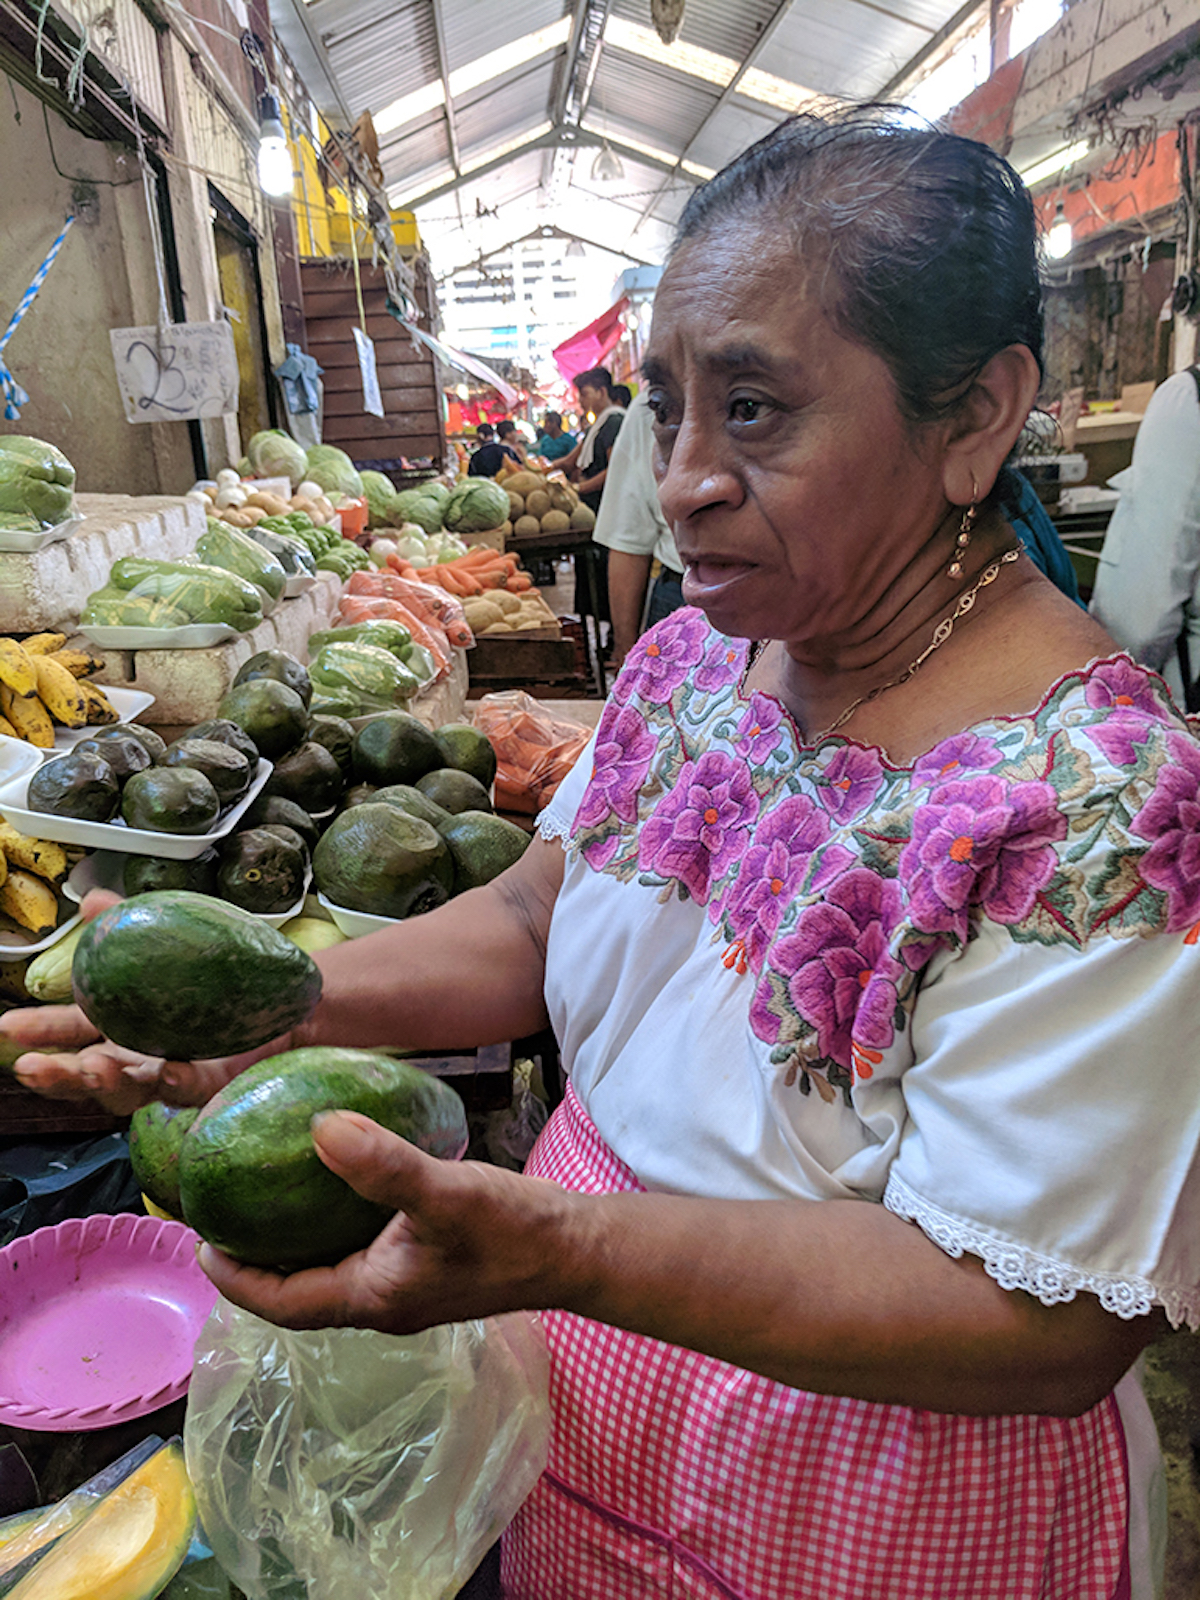
On Thursday, October 19th, we went to the market in Merida to buy and retrieve ingredients for the Bio Dyes.
We bought:
- purple onions
- golden onions
- chaya
- chile xcatic
- jamaica flowers
- achiote seeds
- yucatecan avocados
- carrots
- mamey
We got for free:
- tangerine peels
- green tomato leaves
We found at the lab with Oscar:
- bouganvillea glabra
- bouganvillea spectabilis 2 colors
As a fixative, we decided to use:
- white vinegar
- salt


DYEING TRIALS TEXTILES & BIO PLASTIC
This is a work in progress.
All of the trials have been made on linen and jute, two vegetable fibres made available at the Fablab, and common to the Yucatan area.
So far we experimented with:
- Chaya leaves - no fixative/mordant
- Yucatecan (Fablab) berries - salt
- Purple Onion peels - vinegar
- Avocado seeds - vinegar
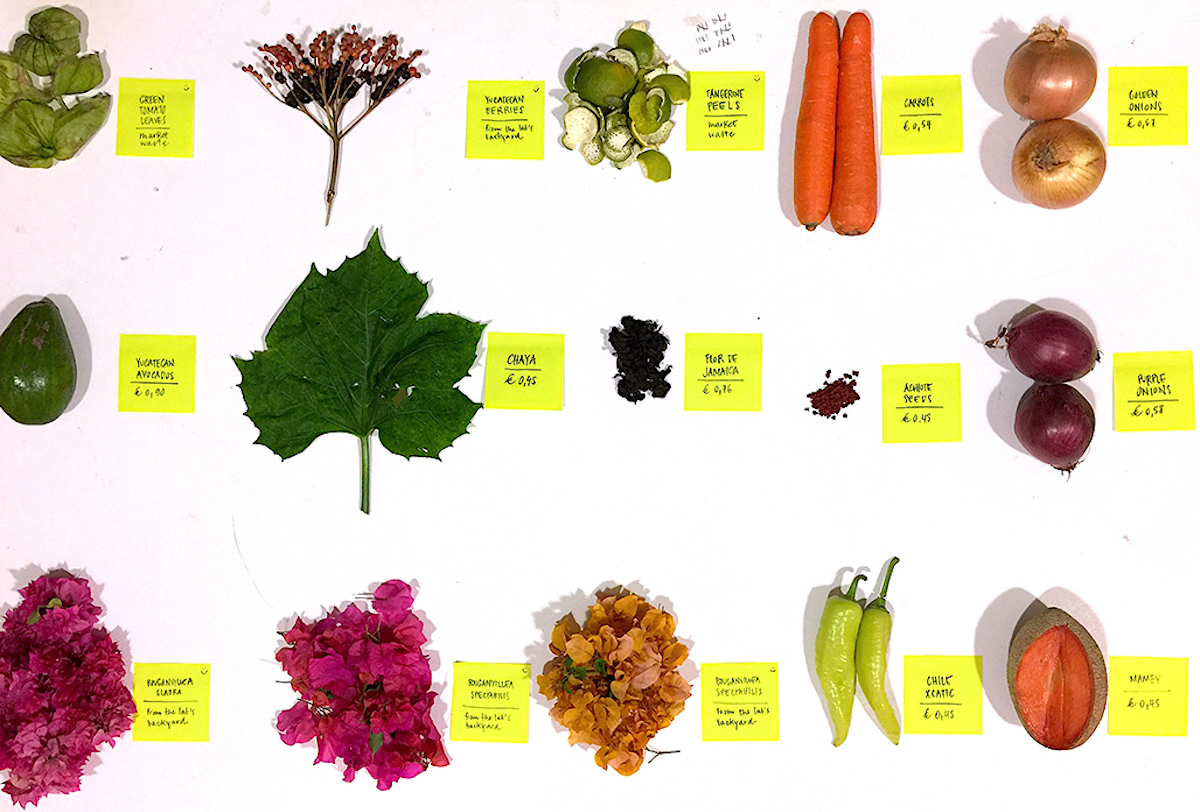
The ingredients purchased at the market and found in the surroundings of Fablab Yucatan.
CHAYA LEAVES
Chaya leaves are a local specialty of Yucatan, used to make agua frescas and other delicacies. The color of agua fresca de chaya is a bright light green and we wanted to see if that color would come out as a textile dye.
We didn't use a fixative/mordant, to see if the color would fix to the textile at all or not. In Peru, when I joined a natural dyeing class on unbleached wool, none of the dyes used fixative/mordant and I wanted to see if it was a critical component in this case.
INGREDIENTS
- Chaya leaves
- Water
PROCEDURE
- I boiled a pot of water together with the Chaya leaves.
- I left the leaves simmering for about an hour before adding the linen and jute samples, so more color was released in the water.
- I kept the linen and jute in the pot with Chaya leaves for about 1 hour and then removed it.
RESULT & REFLECTIONS
- The emerging color is a pale green on the lighter side, with hints of yellowish.
- I will try the same with fixative as well, to see the difference.


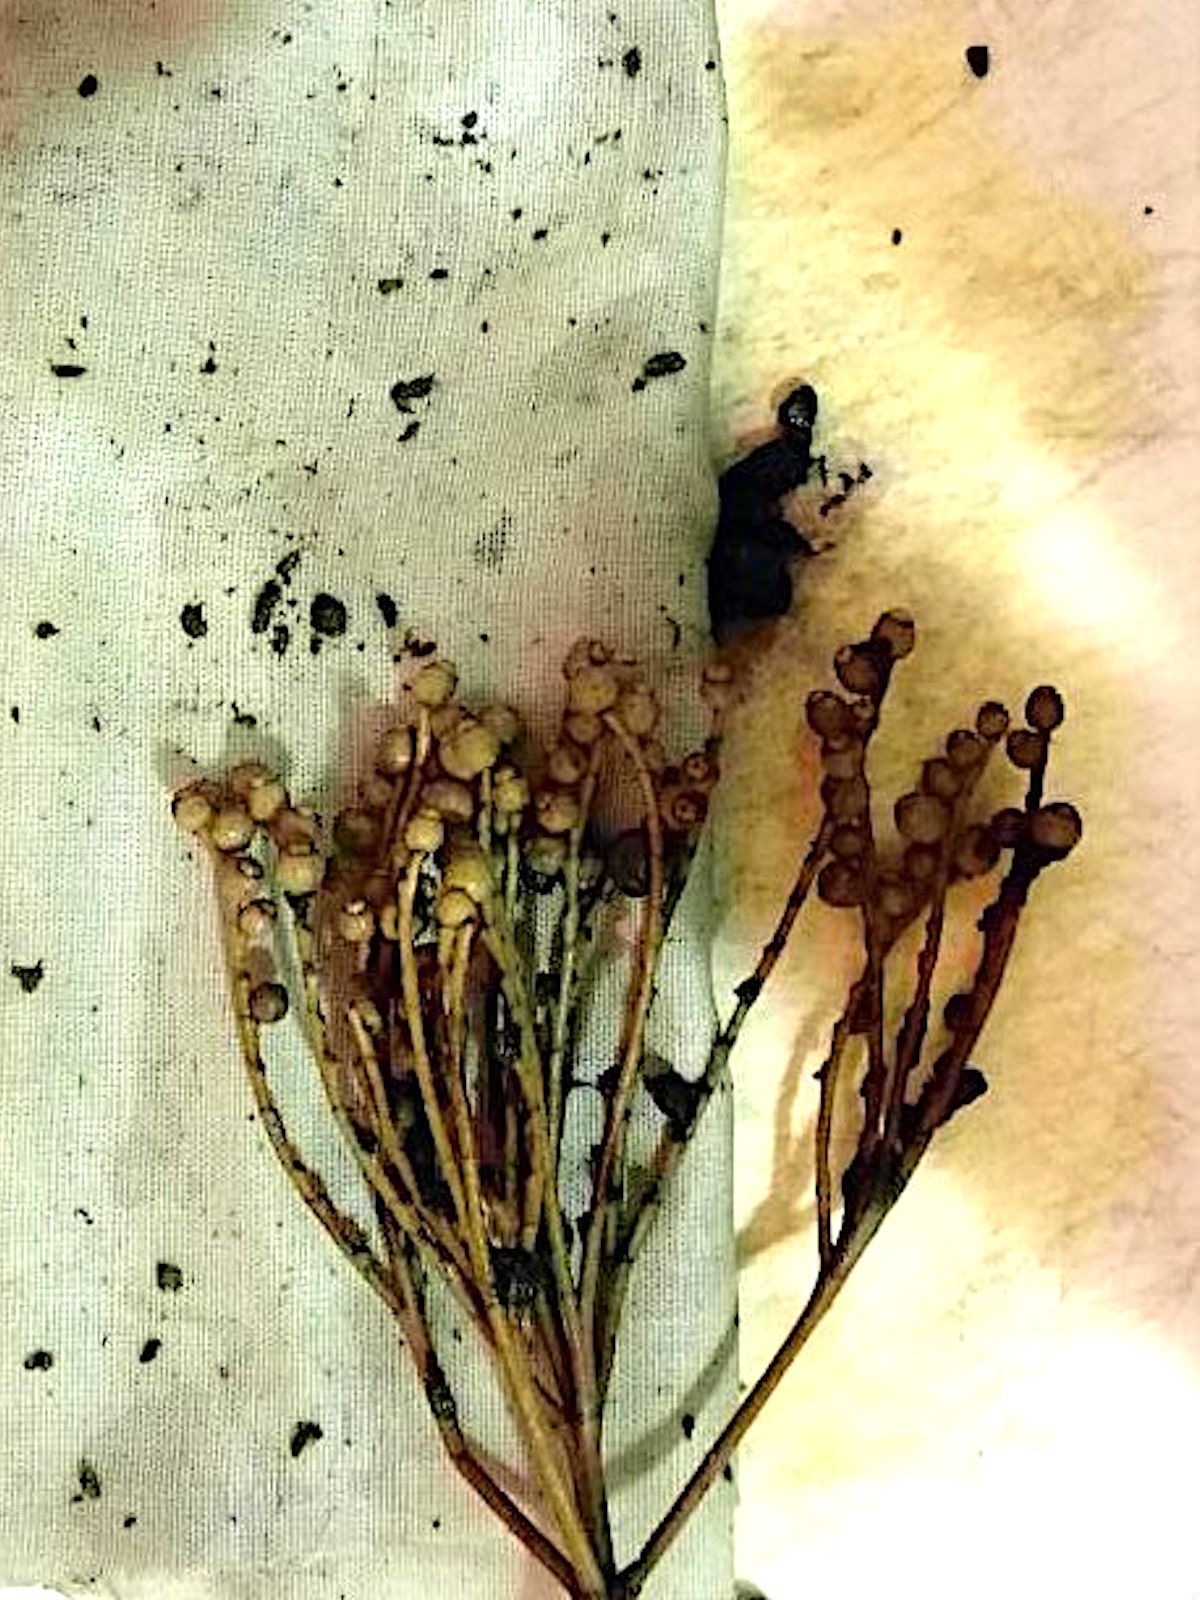
YUCATECAN (FABLAB) BERRIES
INGREDIENTS
- Yucatecan (Fablab) berries
- Salt
- Water
PROCEDURE
- The berries were squeezed yet not boiled.
- The linen was put in salt together with the squeezed berries and their juice.
- The berries with salt were kept in water for a few days (about 3)
RESULTS & REFLECTIONS
- The linen got stained in some points, where the squeezing was more effective
- The rest of the linen remained mostly white, with a shade of grey to it
- Next time better to boil the berries with the water
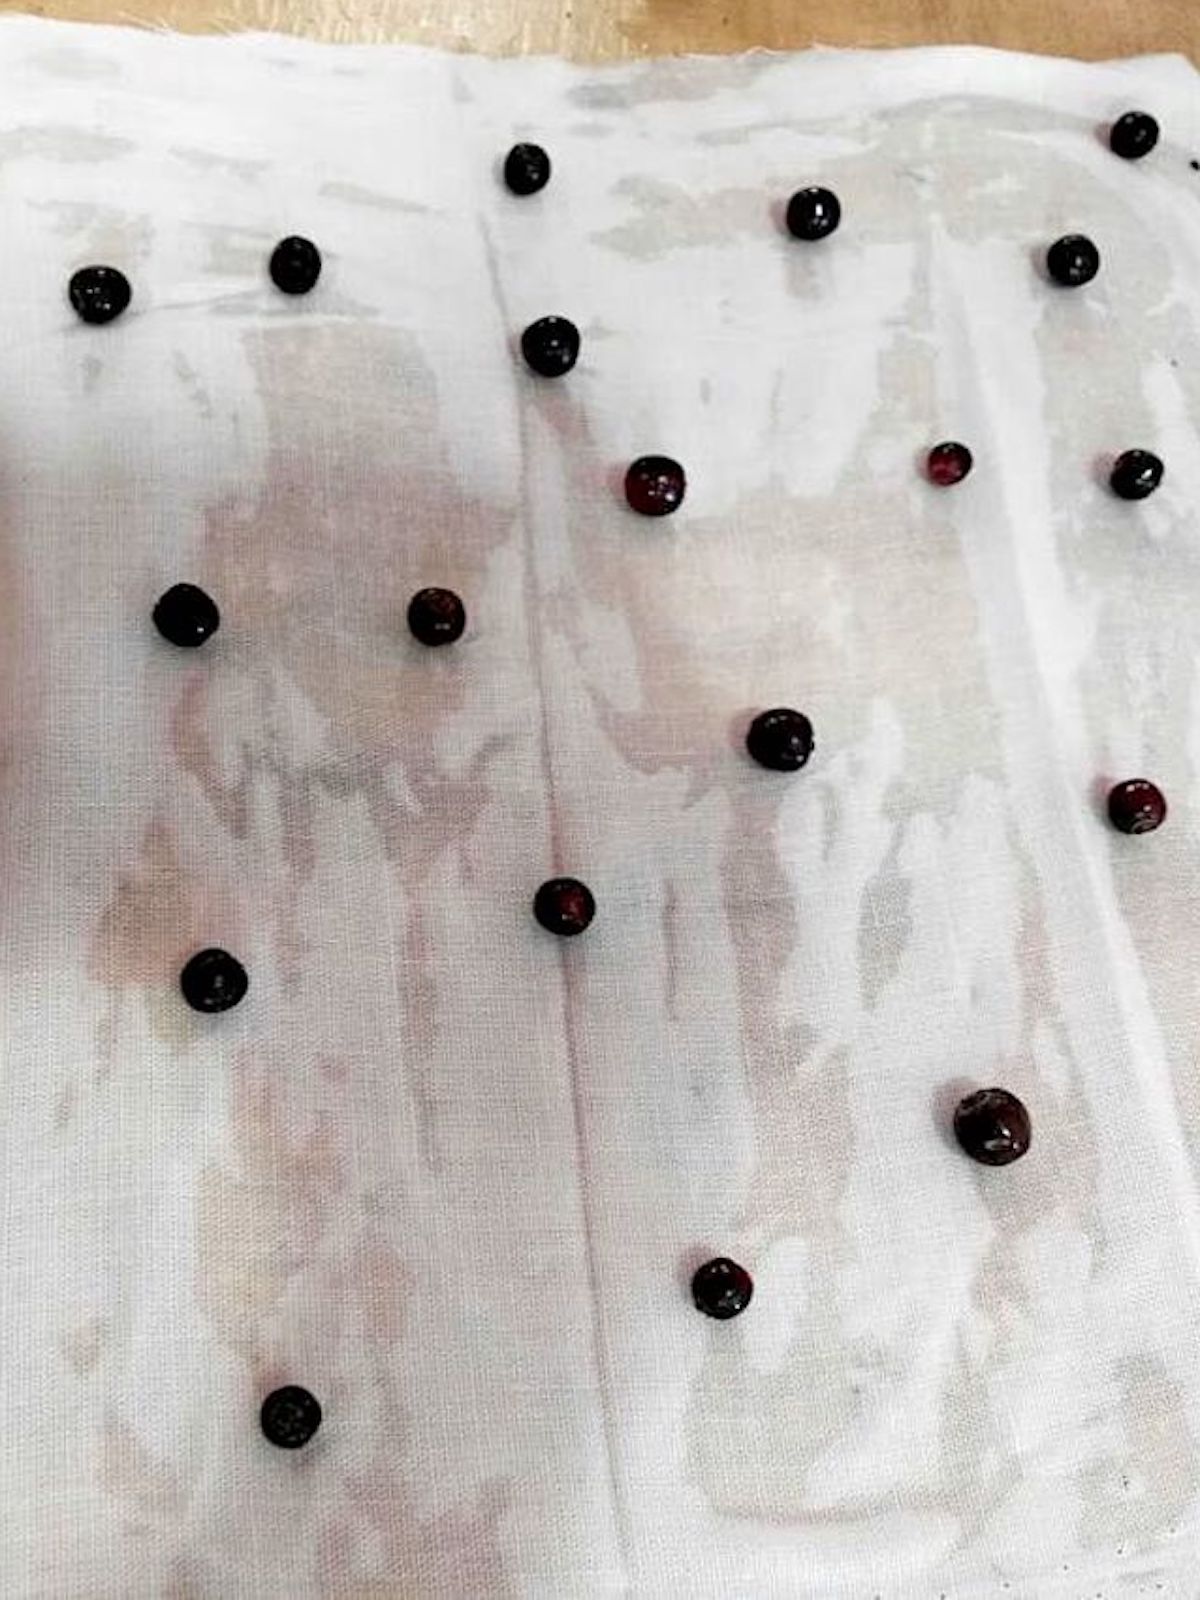
The berries are rubbed with salt on linen

After squeezing the berries
PURPLE ONION & ACHIOTE SEEDS
RECIPE
- Purple Onion Peels
- Achiote Seeds
- White vinegar
- Water
PROCEDURE
- The onion peels and the achiote seeds were used separately, using the same procedure
- The linen and jute in were soaked in 1/4 white vinegar and 3/4 cold water
- They were kept for 1 hour to enable color fixation
RESULTS & REFLECTIONS
- The purple onion came out in a very satisfactory manner, with a nice brown shade.
- Both linen and jute absorbed the dye in a pretty uniform way.
- For darker shades, we can soak the onions or the achiote seeds longer with the textiles.

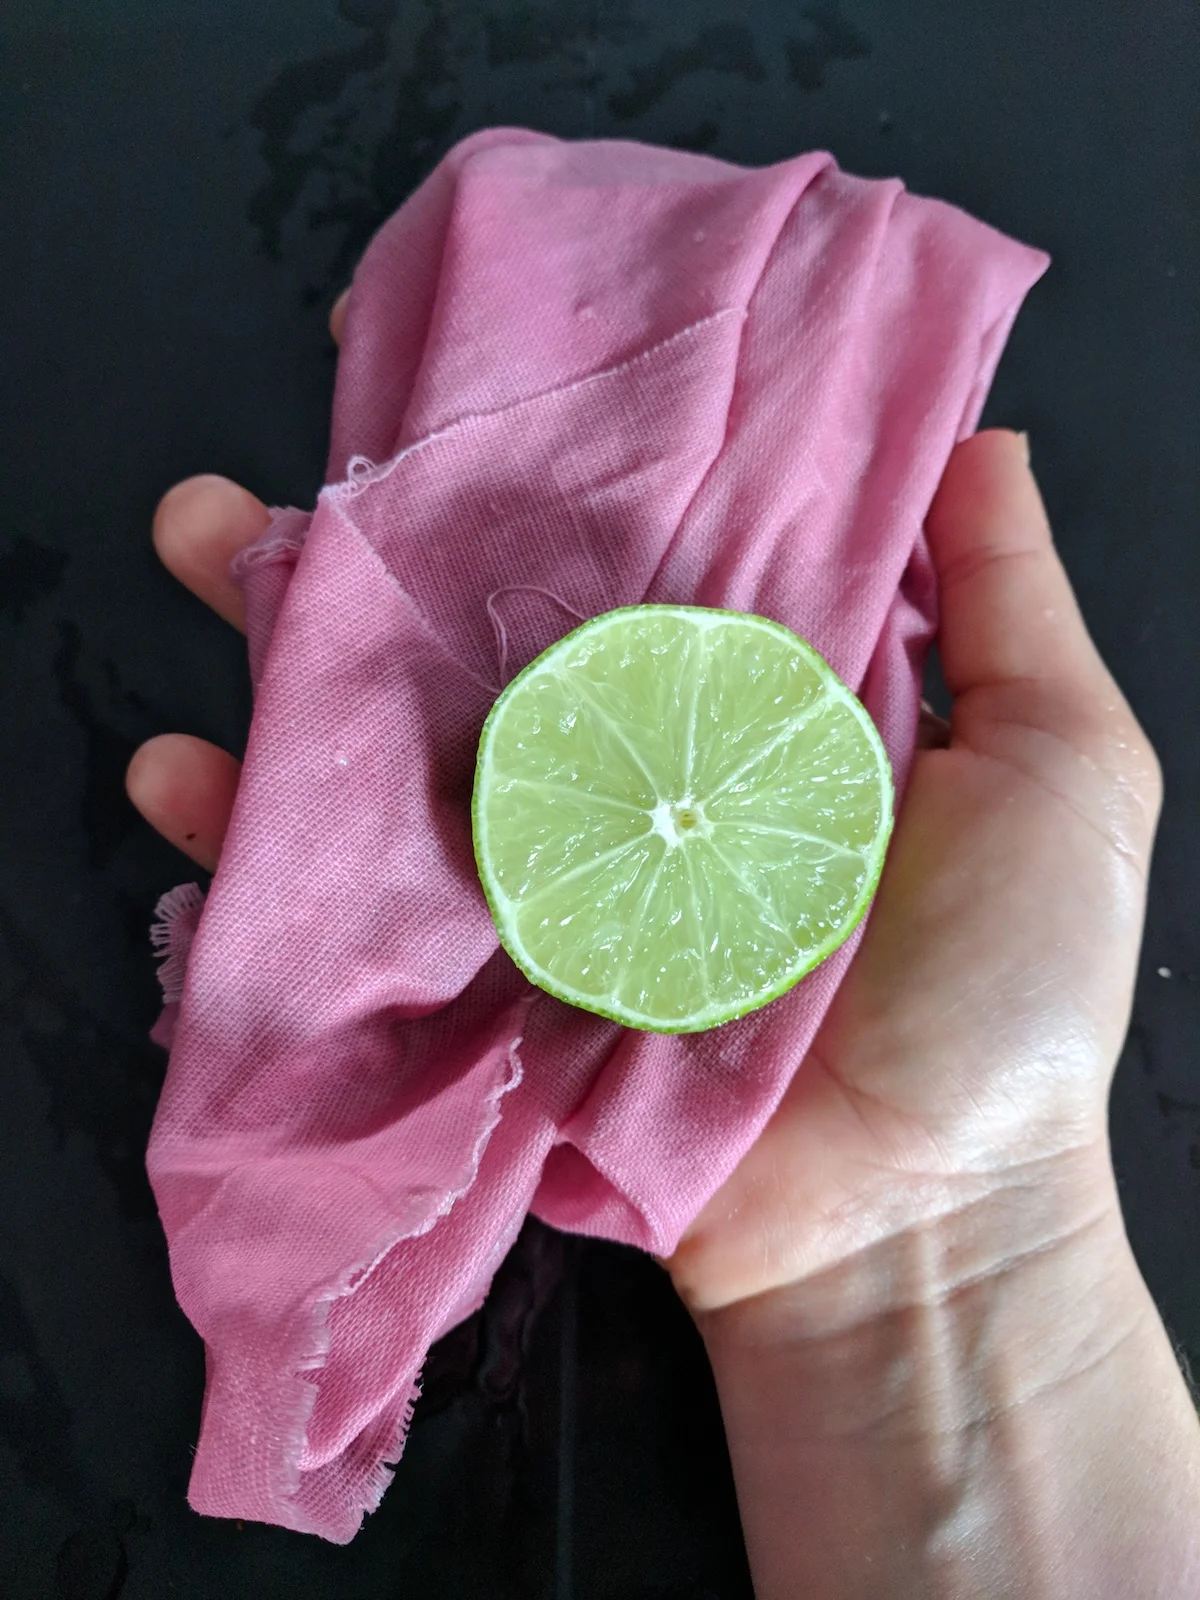
FLOR DE JAMAICA
You can find here a recipe I took inspiration for this dye.
RECIPE
- Dried Jamaica (Hybiscus) Flowers
- White vinegar
- Water
PROCEDURE
- I washed the linen the night before with dish soap and left it to dry
- The linen was soaked in 1/5 white vinegar and 4/5 cold water for 1 hour
- I boiled then let simmer on low heat dried hibiscus flowers (flor de Jamaica) in a pot with a lot of water for 30 min.
- I drained the liquor and removed the flowers. Then left the liquor to cool down.
- I rinsed the linen from the white vinegar and placed it in the cool hibiscus/Jamaica liquor, heating it up to simmer for 30 minutes on low heat
- After that, I checked the Jamaica color on the linen and found out that a nice red towards purplish tones is emerging.
- I left the linen to cool down inside the Jamaica liquor for the whole day and see if it keeps more dye.


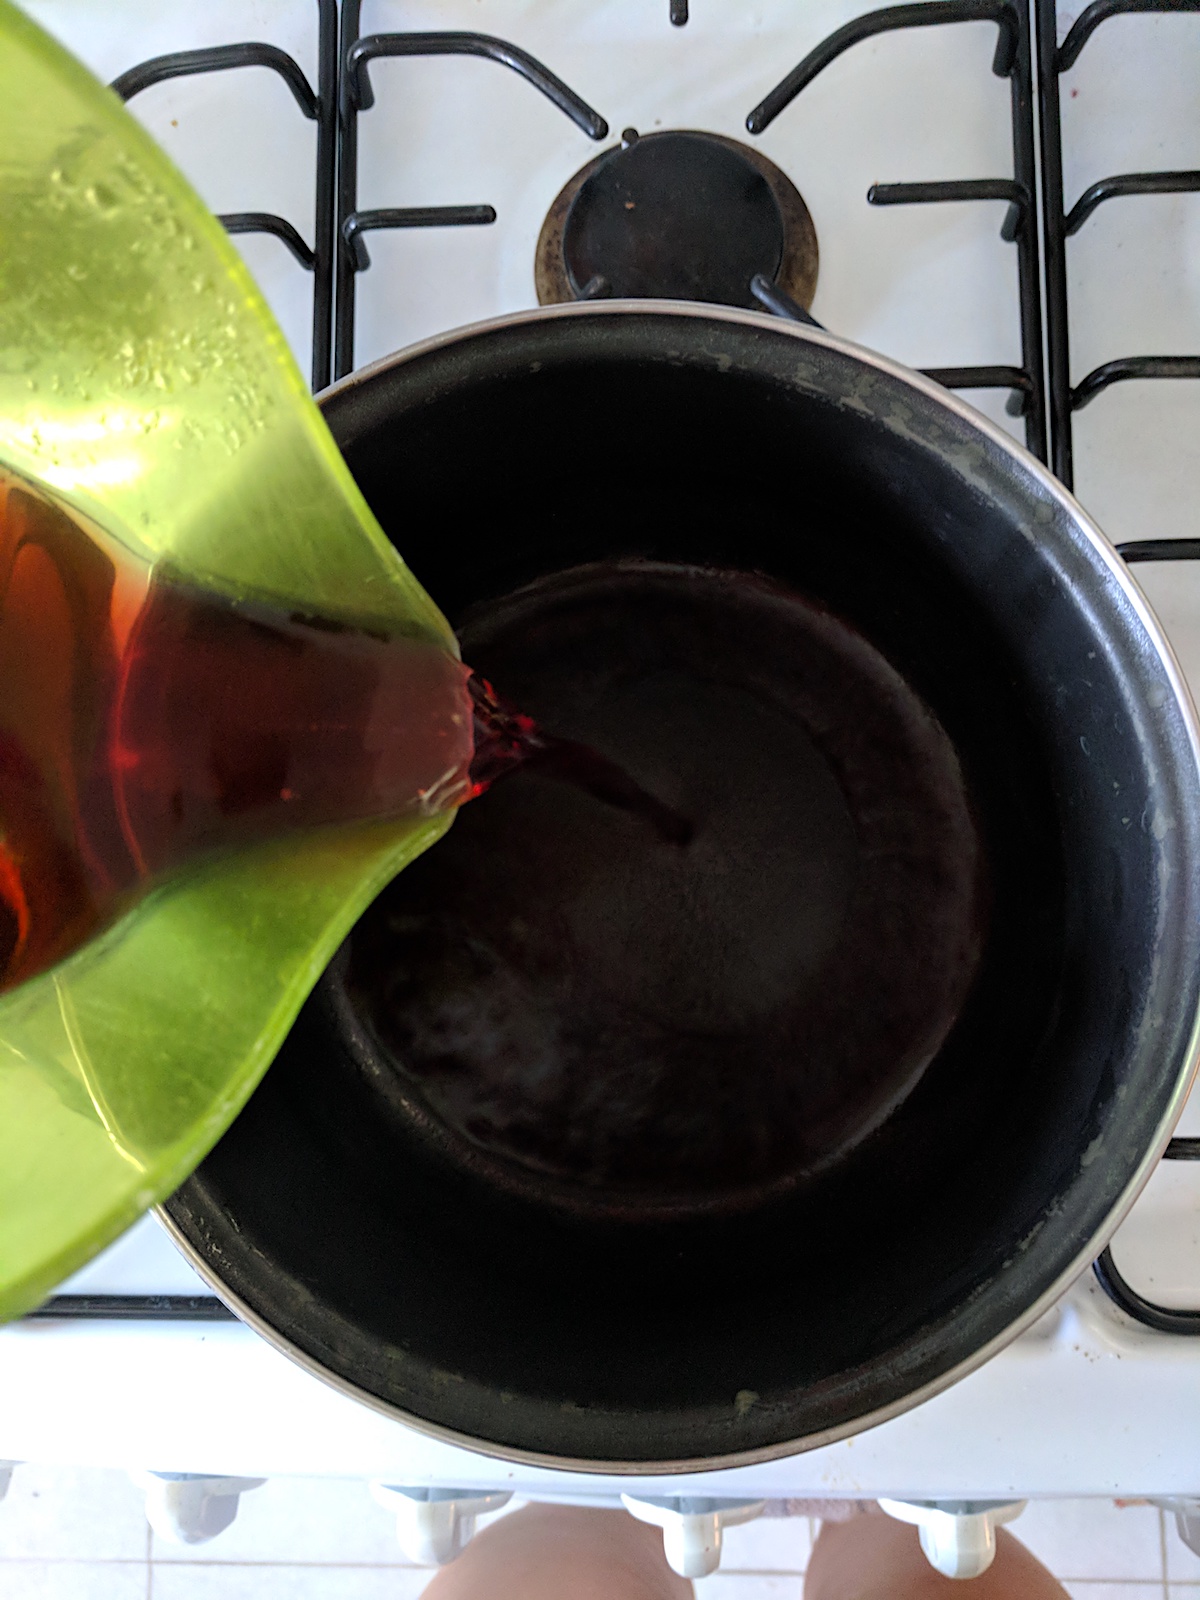


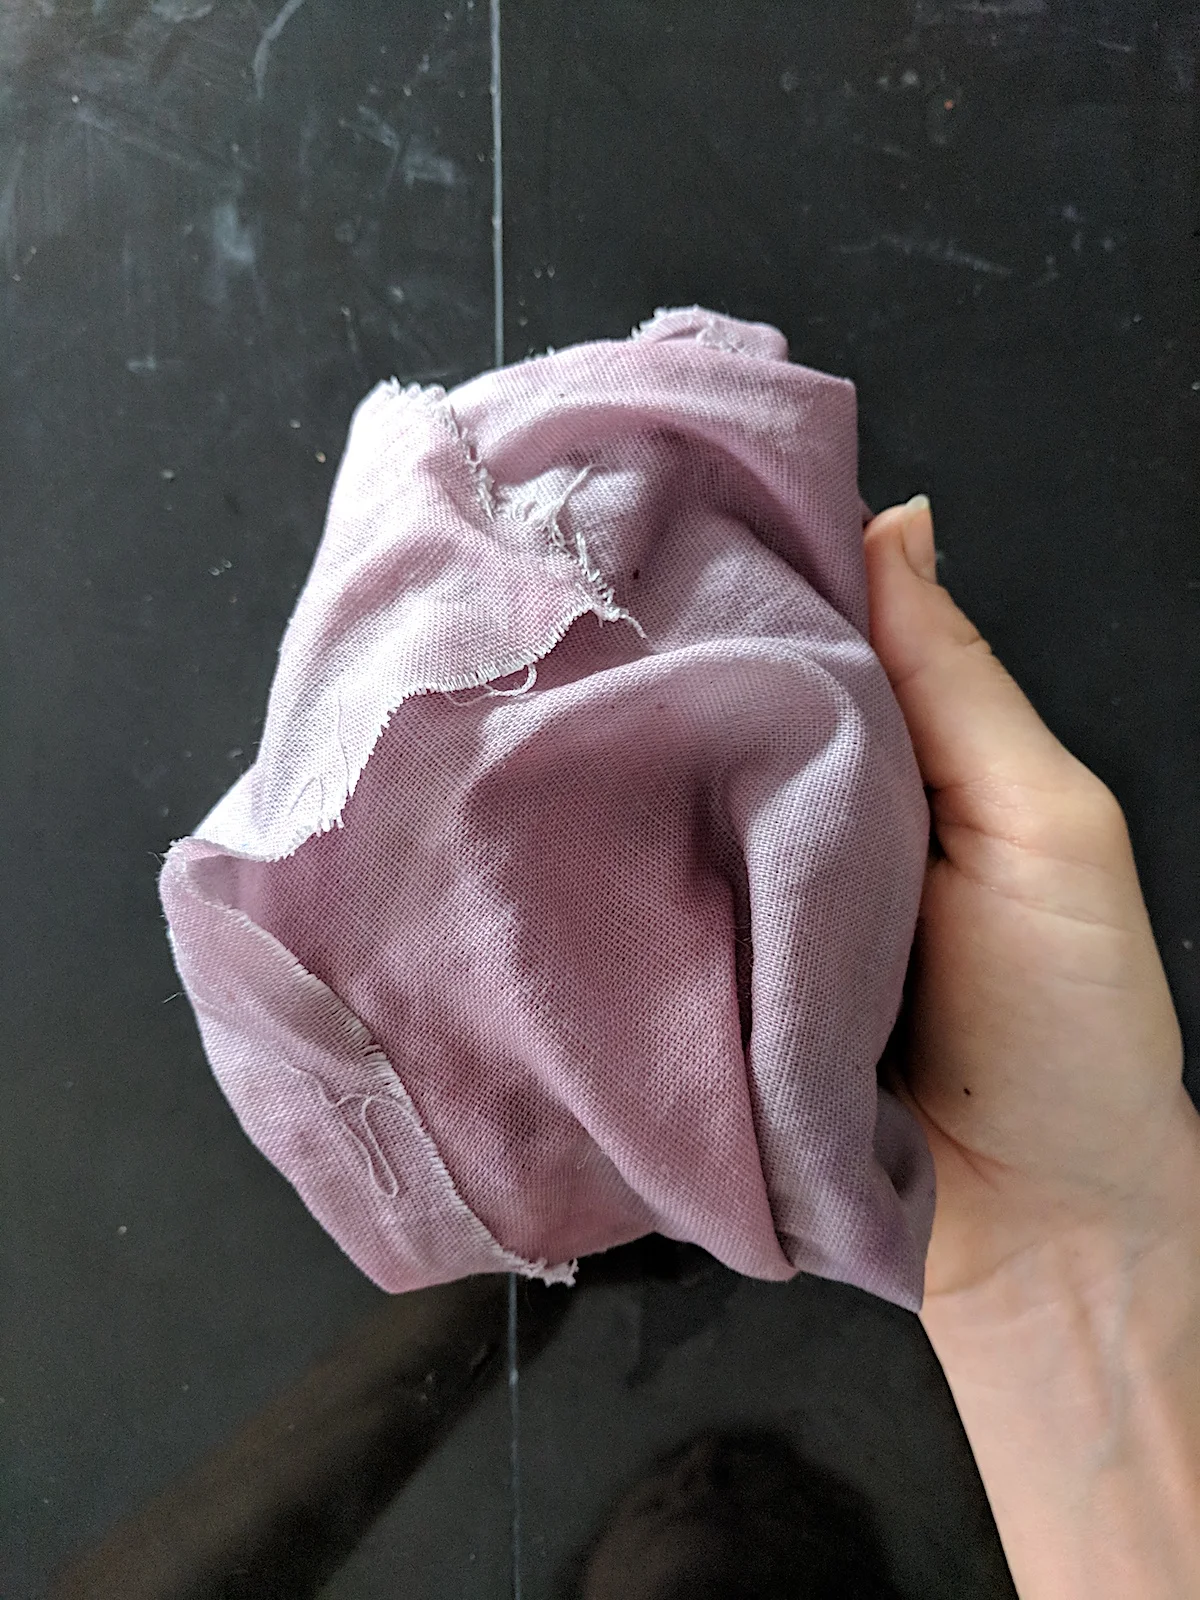

RESULTS & REFLECTIONS
- The dye came out really nicely and very uniform overall the whole linen
- The longer I kept the Jamaica soaking in the warm water, the darker the dye became, which was the best result achieved
- Washing the fabric and using the vinegar, together with stirring the fabric while soaking, helped achieve a nice uniform result
- Adding lime juice at the end allowed the color to pop out very nicely
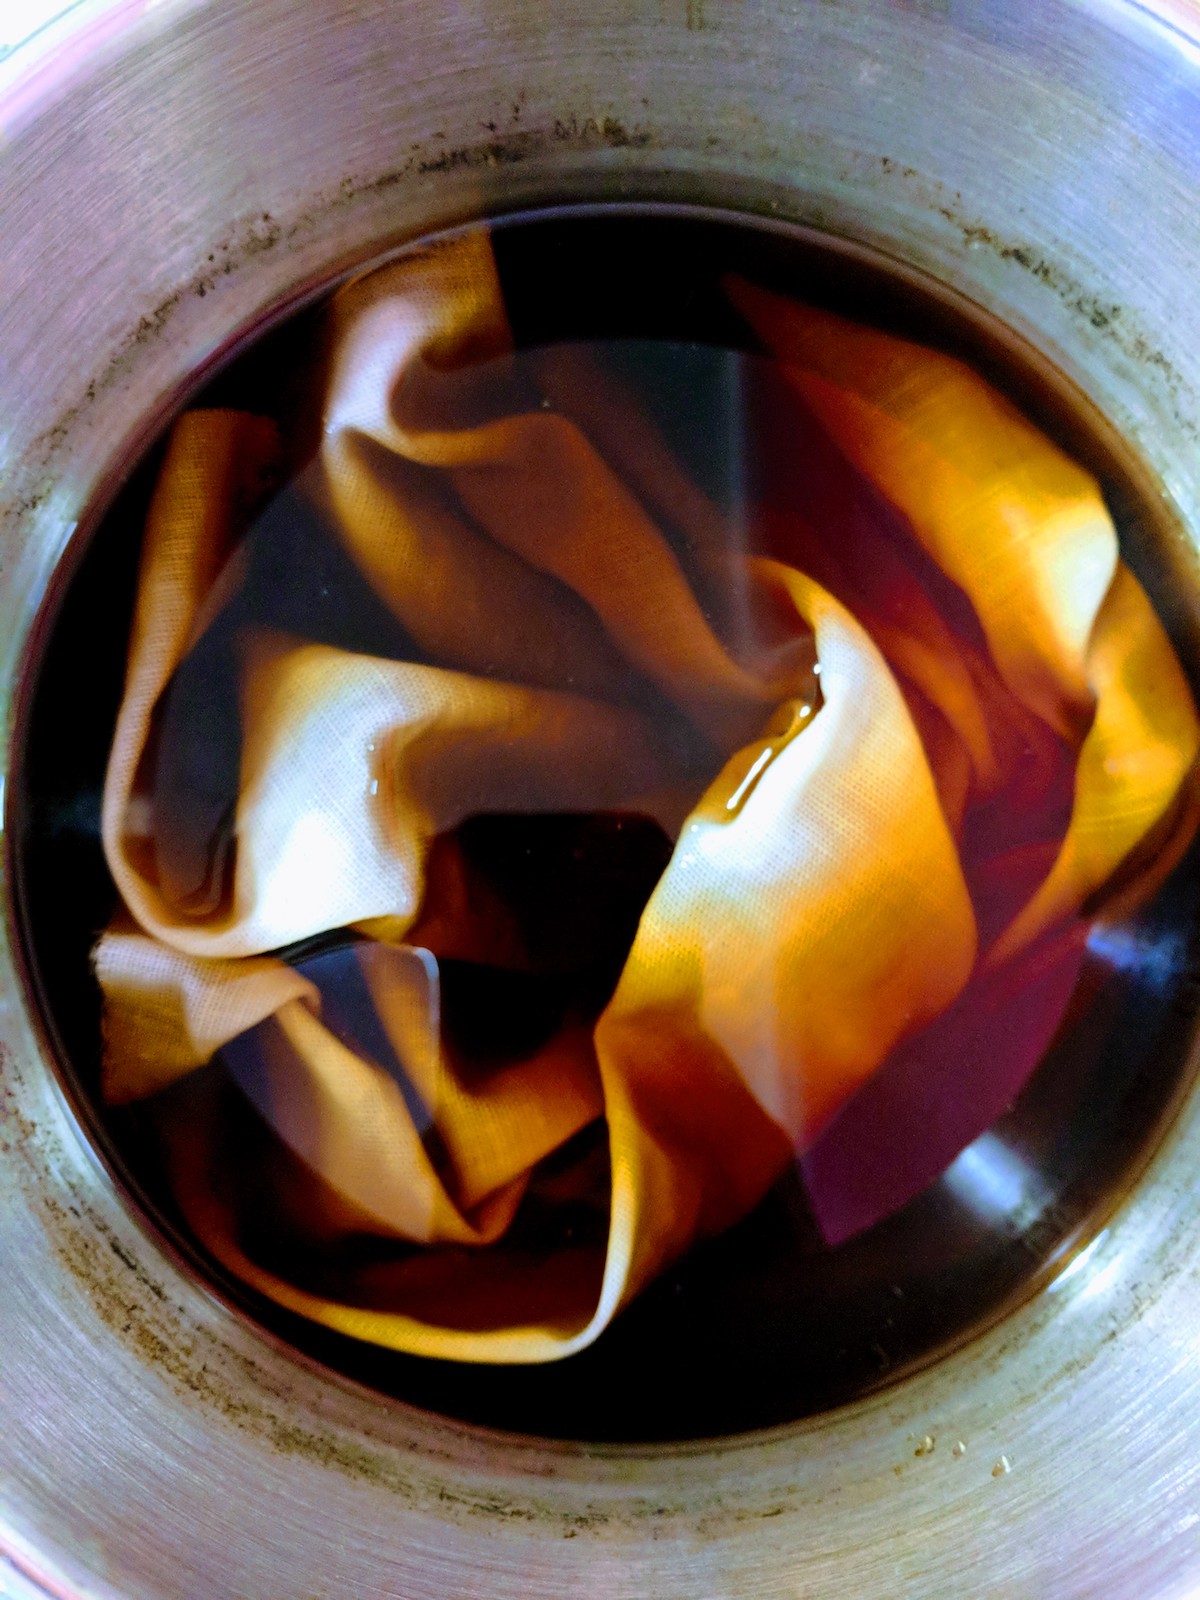
GOLDEN ONIONS
This and this tutorial helped me in dyeing the golden onions
INGREDIENTS
- Golden Onion peels
- Water
- White Vinegar
- Linen & Jute
PROCEDURE
- I placed the Golden onion peels (from 3 big onions) inside a pot with 1,5 liters of water and let them boil, then simmer for one hour.
- At that point the water containing the onion had become a nice brown.
- I let the onions soak in the onion liquor for the whole night.
- In the morning, I removed the onion peels from the liquor.
- I heated up a pot of hot water, where I placed the linen I had treated with white vinegar as a mordant. Vinegar is used to achieve a more uniform color.
RESULTS & REFLECTIONS
- The golden onion dye is a bit lighter than the dark onion peel. The color is a nice brown and it can become darker if kept longer
- I would like the color to pop a bit more, next time I'll try lime like I did with the Jamaica


MANDARIN PEELS
INGREDIENTS
- Green Mandarin Peels
- Linen - 1 sheet
- Iron mordant
- 30 g in 1 liter of water
PROCEDURE
- I soaked the mandarin peels in the iron mordant for 10 minutes
- Then I squashed the peels on the linen with a pestel, wrap with yarn in a tight ball, and simmer for 1 hour in hot water.
- Added salt 15 minutes from the end
- Color emerging is a light brown on the greenish side
REFLECTIONS
- I assume if using alum the green would be more intense rather than brown
- I should keep the mandarin peels soaking for less time. They reach a critical point after which the color becomes brown and there is no coming back
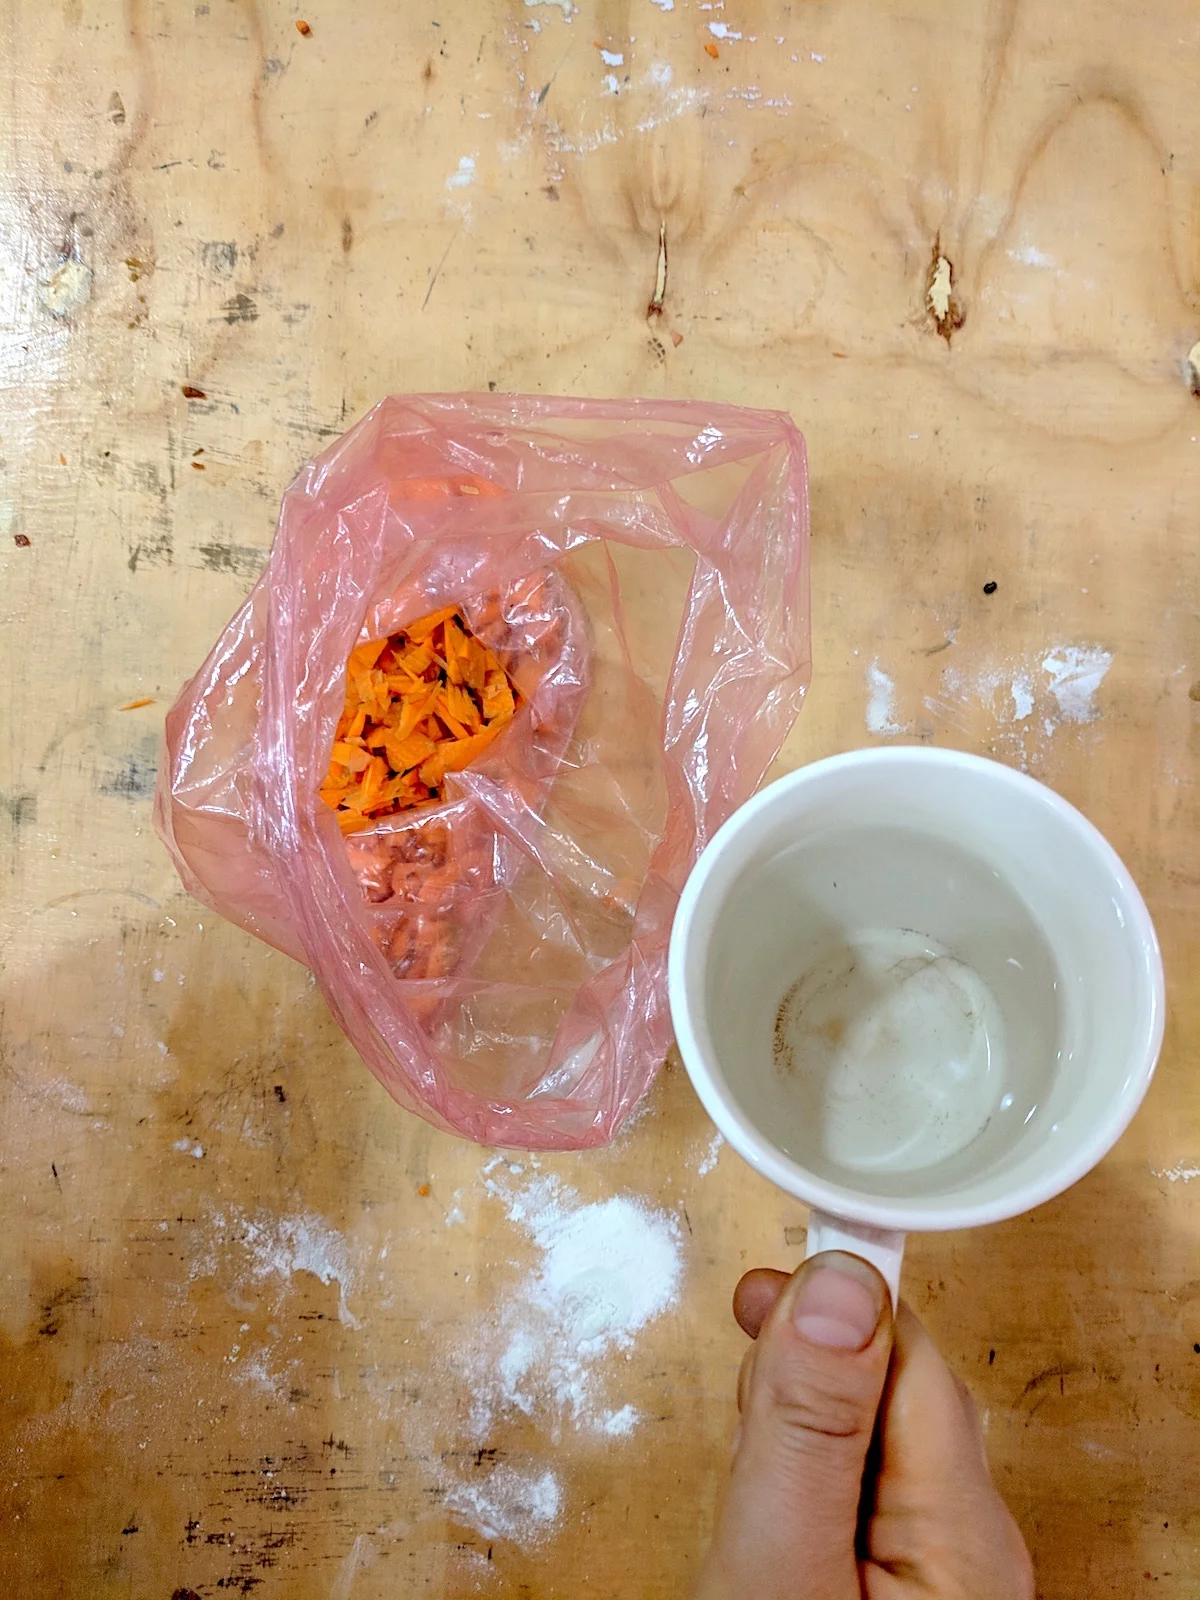
CARROT
This tutorial was my guide in making the carrot dye.
INGREDIENTS
- 5 Medium Carrots
- Water
- Knife
- Linen
- Plastic bag
PROCEDURE
- I grated the carrots in very small pieces, since I didn't have a grater.
- Then I put the carrots in a plastic bag with a bit of water and closed it.
- I kneaded the carrots to get the juice out, then poured the juice in a cup
- I put the carrot pieces inside the linen sheet and made a tight bundle which I kneaded further.
- I let it soak for a couple days
RESULTS & REFLECTIONS
- The dye didn't come out very intense, only a feeble orange.
- Next time I want to use a juicer, to get a carrot puree and soak the linen in that. It might help


GREEN TOMATO LEAVES
INGREDIENTS
- Green tomato leaves
- White Vinegar
- Water
- Linen
PROCEDURE
- I placed the green tomato leaves in a pot with hot water and let them simmer for an hour.
- Meanwhile, I placed a piece of linen in 1/4 white vinegar 3/4 water and left it there for 1 hour.
- The water with the tomato leaves started gaining a green/brownish color, and I placed a piece of linen inside without mordent to see if it would get some color.
- Then I placed the second linen piece, now with vinegar mordent, inside the water with the green leaves.
- I simmered the whole concoction for another hour and noticed that neither the linen without the mordant nor the one with it were gaining a lot of color.
- Just a faded brownish hue. I Removed the leaves from the water and left the linen to dye with the liquor for the whole night.
- In the morning, the liquor has a dark brown color tending to dark grey/black. The two linen samples have gained hardly any color.
RESULTS & REFLECTIONS
- Wash the linen before starting
- Rinse the linen from the vinegar
- Try another mordant
- Remove the leaves from the water after simmering 1 hour
- Add the linen and simmer with care
- Try another textile as well other than linen


BOUGANVILEAS
INGREDIENTS
- Bouganvileas
- Water
- Linen & Jute
PROCEDURE
- I put the bouganvileas in a port filled with water and let them simmer
- After 15 min, I added the linen and the jute and kept the pot simmering for another 30 min
- I took the linen
RESULTS & REFLECTIONS
- The nice pink color of the bouganvilea became a light green when boiling. Probably the pigment doesn't resist heat
- Next time I'll try it with mordant, like vinegar or iron, but I'm afraid this flower is more difficult to extract a color from
AVOCADO SEEDS
INGREDIENTS
- Avocado seeds
- Water
- Linen & Jute
PROCEDURE
- We extracted the avocado seeds from the avocado and cut them in small pieces
- We then soaked them in water and kept them there for a week
- After that, we placed linen
RESULTS & REFLECTIONS
- The nice pink color of the bouganvilea became a light green when boiling. Probably the pigment doesn't resist heat
- Next time I'll try it with mordant, like vinegar or iron, but I'm afraid this flower is more difficult to extract a color from
BIOPLASTIC BIO-DYEING
Get info from Melina and Sara

Final display of all the bio dyes.